
보근은 참고 있다
4주차 과제: 제어문 본문
- 선택문
- 반복문
- 과제 0 : JUnit 5 학습하세요.
- 과제 1 : live-study 대시 보드를 만드는 코드를 작성하세요.
- 과제 2 : LinkedList를 구현하세요.
- 과제 3 : Stack을 구현하세요.
- 과제 4 : 앞서 만든 ListNode를 사용해서 Stack을 구현하세요.
- 과제 5 : Queue를 구현하세요.
선택문
switch는 if처럼 프로그램 내에서 분기를 만들어 준다. switch가 하는 일을 if와 else if, else로 충분히 할 수 있지만 단일 변수에 의존하는 분기 상황의 경우 switch문이 더 뛰어난 가독성을 보여준다.
switch의 분기를 나타낼 변수는 char, byte, short, int와 이들의 wrapper class, String과 enum이 올 수 있다.
int a = 5;
int b = 10;

switch(a) {

    case 3 :
    	System.out.println("Hi");
        break;

    case 4 :
    	System.out.println("Bye");
        break;

    default :
        System.out.println(a);
        break;

}

switch(b) { // break가 없는 경우.

	case 9 :
    	System.out.println("Hello");

    case 10 :
        System.out.println("I`m");

    case 11 :
    	System.out.println("Bogeun");

    default :
    	System.out.println("HaHa");

}
위의 예시를 보면 switch 예약어 뒤에 분기를 결정할 변수가 들어간다. 각각의 분기는 case 예약어로 나뉘어 있다. 각각의 case는 실행할 구문과 switch문을 종료할 break가 온다. 모든 case에 해당되지 않으면 default를 수행한다. default마저 없으면 아무런 동작도 없이 넘어간다.
각 case마다 break가 없다면, 해당하는 case를 실행 후 종료되지 않고 다음 case의 동작까지 수행해버린다. 의도하고 사용할 수도 있지만, 예상과 다르게 수행될 수도 있으니 알아두는게 좋을 거 같다.
- 변수에 맞는 case를 수행한다.
- 수행하는 case에 break가 없으면 뒤에 작성된 case를 조건에 상관없이 수행한다.
- 뒤에 작성된 case에도 break가 없으면 또 다시 뒤의 case를 수행하길 반복한다.
- break가 있는 case를 만나면 종료한다.
- 마지막까지도 break를 만나지 못하면 끝까지 수행한다.
반복문
반복문은 조건에 해당하는 상태를 가지고 있으면 같은 동작을 반복한다. 반복문은 for와 while이 있다.
- while
int n = 10;

while(n > 5) {

    System.out.println(n--);

}
while 문은 위의 예시처럼 예약어 뒤에 조건식이 들어오고, 뒤에 수행할 동작의 블럭이 들어온다. 조건식이 true라면 수행되고, false라면 수행을 멈춘다.
간단하게 쓸 수 있지만, while문을 빠져나올 길을 필수적으로 만들어줘야 한다. 위의 예시처럼 조건식의 변수에 증감을 넣어서 적절한 반복 후에 멈추게 할 수도 있고, 동작 블럭 내에 break를 넣어 멈춰줄 수도 있다.
do-while 문을 작성하면 while의 조건식과 상관없이 딱 한 번의 동작은 필수적으로 수행하게 할 수도 있다. 원래 조건식을 만족하지 못하던 상태에서 do 예약어로 한 번 실행 후에 조건식을 만족하게 되어도 while문이 실행된다.
int n = 6;

while(n < 6 && n > 0) {

    System.out.println(n--);

}


do {

	System.out.println(n--);
    if(n == 0) {
    	break;
    }

} while(n < 6);
do-while 문은 위처럼 작성을 한다. 위의 while 문은 조건식을 만족하지 못해 동작이 되지 않지만, 뒤의 do-while 문은 첫 번째의 수행에서 조건식을 만족하는 상태가 되었기 때문에 반복문이 수행된다.
아래의 경우는 while의 조건식에는 해당되지만 코드 블럭 내에서 break로 반복을 멈춰준 경우로 6부터 1까지 반복 출력 후에 종료된다.
-for
for(int i = 0 ; i < 10 ; i++) {
	System.out.println("i");
}

for(int i = 0 ; true ; i++) {
	if(i > 10) {
    	break;
    }
    if(i % 2 == 0) {
    	continue;
    }

	System.out.println("i");
}
for 문은 위처럼 for( 초기화식 ; 조건식 ; 증감식 ) 과 그 뒤에 수행할 블럭의 구조로 이뤄진다. while 문과 마찬가지로 조건식이 true이면 반복된다. 위의 예시는 1부터 9까지 반복 출력 후 종료된다.
아래의 예시처럼 조건식이 true인 경우는 무한정 반복한다. 하지만 break문으로 반복문을 종료하도록 작성하였다. continue 예약어는 아래의 동작을 수행하지 않고 다시 반복문의 첫 줄로 실행을 옮긴다. 예시에선 짝수인 경우 continue 예약어를 호출 했으니, 결과적으로 1, 3, 5, 7, 9 의 홀수들만 찍힌다.
- 이름을 가지는 for문
hello : // hello란 이름을 붙여줌.
for(int i = 0 ; i < 10 ; i++) {
	for(int j = 0 ; j < 5 ; j++) {
		if(i == 3)
			break; // 현재의 반복문을 종료.
		else if(i == 5)
			break hello; // hello 반복문의 종료.

		System.out.println("i = "+i+" j = "+j);
    }
}
위의 예시처럼 for문에 이름을 붙여줄 수 있다. 위는 이중 for문으로 i가 3일 때 if문에 걸려 i가 3인 경우는 아래의 문장이 찍히지 않는다. i가 4인 경우를 돌고 5가 되었을 때는 hello라는 이름이 붙은 반복문이 종료하게 된다. 결과적으론 이중 for문이 종료된다.
-forEach
int[] arr = { 1, 2, 3, 4 ,5 };

for(int i : arr) {
	System.out.println(i);
}
위는 forEach 문의 예시로 Collection의 객체들이나 배열의 요소들을 순차적으로 다루는 반복문이다. Colletion의 객체를 전부 한 번씩 다루거나 배열의 모든 요소를 한 번씩 다 다룬 후에 종료된다.
과제 0 : JUnit 5 학습하세요.
^_^
과제 1 : live-study 대시 보드를 만드는 코드를 작성하세요.
import org.kohsuke.github.*;

import java.io.IOException;
import java.util.*;

public class Main {
    private static final int WEEKS_CNT = 18;

    public static void main(String[] args) throws IOException {

        GitHub gitHub = new GitHubBuilder().withOAuthToken("personalAccessToken").build();
        GHRepository repository = gitHub.getRepository("whiteship/live-study");

        List<String> studentNames = new ArrayList<>();
        Map<String, boolean[]> studyCheck = new HashMap<>();

        for (int i = 1; i <= WEEKS_CNT; i++) {
            GHIssue issue = repository.getIssue(i);
            List<GHIssueComment> comments = issue.getComments();

            for (GHIssueComment comment : comments) {
                String studentName = comment.getUser().getLogin();

                if (studentNames.contains(studentName)) {
                    boolean[] check = studyCheck.get(studentName);
                    check[i] = true;
                } else {
                    studentNames.add(studentName);
                    boolean[] b = new boolean[WEEKS_CNT+1];
                    b[i] = true;
                    studyCheck.put(studentName, b);
                }
            }
        }

        String[] students = studentNames.toArray(new String[0]);
        Arrays.sort(students);

        StringBuilder sb = new StringBuilder("|참여자|1주차|2주차|3주차|4주차|5주차|6주차|7주차|8주차|9주차|10주차|11주차|12주차|13주차|14주차|15주차|16주차|17주차|18주차|참석율|\n" +
                "|----------|---|---|---|---|---|---|---|---|---|---|---|---|---|---|---|---|---|---|-----|\n");
        for (String student : students) {
            boolean[] check = studyCheck.get(student);
            int cnt = countTrue(check);
            String rate = String.format("%.2f", (double) cnt / WEEKS_CNT * 100);

            sb.append("|" + student + "|");
            for (int i = 1 ; i <= WEEKS_CNT ; i++) {
                if (check[i]) {
                    sb.append("✅|");
                } else {
                    sb.append("|");
                }
            }
            sb.append(rate + "%|\n");
        }

        System.out.println(sb.toString());
    }

    private static int countTrue(boolean[] check) {
        int cnt = 0;

        for (boolean b : check) {
            if(b) {
                cnt++;
            }
        }

        return cnt;
    }
}
결과 : github.com/idiot2222/practice-github_api/blob/main/README.md
과제 2 : LinkedList를 구현하세요.
리스트는 배열과 같은 선형 자료구조이다. 데이터의 순서가 있고, 중복이 허용된다. 초기화 시에 정해진 길이가 변하지 않는 배열과 달리 리스트는 길이가 유동적으로 바뀐다. 배열은 메모리에서 데이터들이 길게 이어져 붙어 있다. 리스트는 구현에 따라 다른데, 배열 리스트의 경우 배열과 같다.
연결 리스트는 배열과 다르게 데이터를 갖고 있는 노드들이 메모리 상에 흩어져 있는 자료 구조이다. 각 노드들은 데이터와 자신과 연결된 다음 노드의 주소를 갖고 있다.
배열 리스트의 경우, 인덱스를 통해 데이터에 랜덤 엑세스가 가능해 데이터에 대한 접근이 빠르다. 반면에, 연결 리스트의 경우에는 어떠한 데이터에 접근하기 위해서는 리스트의 가장 첫 번째 노드인 head에서부터 목적지까지 순차 탐색을 해야한다.
배열 리스트의 경우, 새로운 데이터를 추가하는데 비용이 많이 든다. 배열 리스트에 데이터를 추가하려고 하면, 추가하려는 위치부터 그 뒤의 데이터들은 전부 한 칸씩 뒤로 밀어줘야 한다. 만약에 배열에 빈 공간이 없다면, 크기가 더 큰 새로운 배열을 만들어 데이터들을 다 옮겨줘야 한다. 반면에, 연결 리스트의 경우에는 추가하려는 위치의 직후 노드를 참조하고, 직전 노드가 새로운 노드를 참조하도록 해주면 끝이다.

-ListNode 구현
public class ListNode {

    int data;
    ListNode next;

    public ListNode(int data) {
        this.data = data;
        this.next = null;
    }


    public ListNode add(ListNode head, ListNode nodeToAdd, int position) {
        ListNode p = head;

        if(position == 0) {
            nodeToAdd.next = p;
            return nodeToAdd;
        }

        while(--position > 0) {
            p = p.next;
        }

        if(p.next != null) {
            nodeToAdd.next = p.next;
        }
        p.next = nodeToAdd;

        return head;
    }

    public ListNode remove(ListNode head, int positionToRemove) {
        ListNode p = head;

        if(positionToRemove == 0) {
            return p.next;
        }

        while(--positionToRemove > 0) {
            p = p.next;
        }

        p.next = p.next.next;

        return head;
    }

    public boolean contains(ListNode head, ListNode nodeToCheck) {
        ListNode p = head;

        while(p != null) {
            if(p.data == nodeToCheck.data) {
                return true;
            }
            p = p.next;
        }

        return false;
    }


    /**
     *  테스트용 메서드
     */
    public void printAll() {
        ListNode head = this;

        System.out.print(data+" ");
        while (head.next != null) {
            head = head.next;
            System.out.print(head.data+" ");
        }
    }

    public int size() {
        ListNode p = this;
        int cnt = 1;

        while(p.next != null) {
            p = p.next;
            cnt++;
        }

        return cnt;
    }

    public int get(int idx) {
        ListNode p = this;

        while(idx-- > 0) {
            p = p.next;
        }

        return p.data;
    }
}
- ListNodeTest
import org.junit.jupiter.api.Test;

import static org.junit.jupiter.api.Assertions.*;

class ListNodeTest {


    @Test
    void add() {
        ListNode list = new ListNode(1);
        list = list.add(list, new ListNode(0), 0);
        list.add(list, new ListNode(3), 2);
        list.add(list, new ListNode(2), 2);

        assertEquals(list.size(), 4);
        assertEquals(list.get(0), 0);
        assertEquals(list.get(1), 1);
        assertEquals(list.get(2), 2);
        assertEquals(list.get(3), 3);

        list.printAll();
    }


    @Test
    void remove() {
        ListNode list = new ListNode(-1);
        list.add(list, new ListNode(1), 1);
        list.add(list, new ListNode(-1), 2);
        list.add(list, new ListNode(2), 3);
        list.add(list, new ListNode(-1), 4);

        list = list.remove(list, 0);
        list.remove(list, 1);
        list.remove(list, 2);

        assertEquals(list.size(), 2);
        assertEquals(list.get(0), 1);
        assertEquals(list.get(1), 2);

        list.printAll();
    }


    @Test
    void contains() {
        ListNode list = new ListNode(1);
        list.add(list, new ListNode(2), 1);
        list.add(list, new ListNode(3), 2);
        list.add(list, new ListNode(4), 3);

        assertTrue(list.contains(list, new ListNode(1)));
        assertTrue(list.contains(list, new ListNode(2)));
        assertTrue(list.contains(list, new ListNode(4)));
        assertFalse(list.contains(list, new ListNode(5)));

        list.printAll();
    }
}
과제 3 : Stack을 구현하세요.
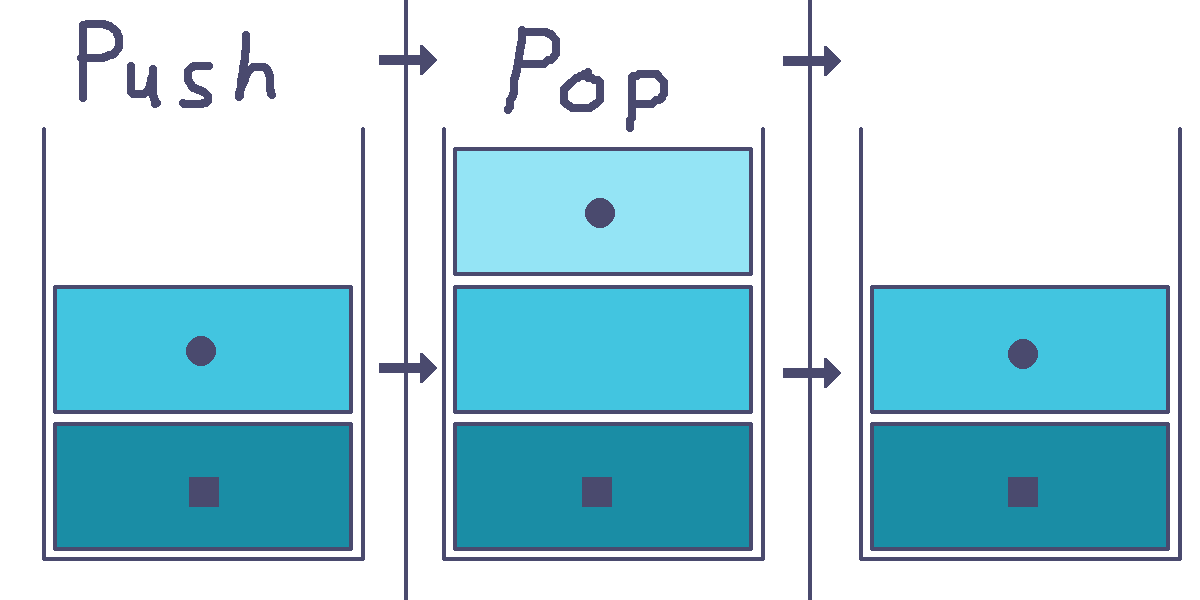
스택은 먼저 들어간 데이터가 나중에 나오고, 가장 나중에 들어간 데이터가 가장 먼저 나오는 후입 선출(Last In-First out)의 입출력 형태를 가지는 자료 구조이다. 창고에 겹겹이 쌓여있는 짐들이 있고, 밑에 있는 짐을 꺼내기 위해선 위에 쌓여있는 짐들부터 꺼내야하는 것을 상상하면 비슷한 거 같다.
스택의 가장 상단의 데이터를 top, 가장 아래의 데이터를 bottom이라 부른다. 스택에 들어간 데이터는 요소(element)라고 부른다. 요소가 하나도 없는 스택 즉, 비어있는 스택을 empty stack이라 부른다.
스택에 요소를 추가하는 것을 push, top의 요소를 꺼내는 것을 pop이라고 한다.
-Stack 구현
public class Stack {

    int[] stack = new int[5];
    int top = -1;

    public Stack() {
    }


    public void push(int data) {
        stack[++top] = data;
    }

    public int pop() {
        return stack[top--];
    }


    /**
     * 테스트용 메소드
     */

    public void printAll() {
        for(int i = 0 ; i <= top ; i++) {
            System.out.print(stack[i]+" ");
        }
        System.out.println();
    }

    public int size() {
        return top+1;
    }

    public int get(int idx) {
        if(idx > top) {
            throw new ArrayIndexOutOfBoundsException("top = "+top);
        }
        return stack[idx];
    }
}
-StackTest
import org.junit.jupiter.api.Test;

import static org.junit.jupiter.api.Assertions.*;

class StackTest {


    @Test
    void push() {
        Stack stack = new Stack();

        stack.push(1);
        stack.push(2);
        stack.push(3);

        assertEquals(stack.size(), 3);
        assertEquals(stack.get(0), 1);
        assertEquals(stack.get(1), 2);
        assertEquals(stack.get(2), 3);
        stack.printAll();
    }


    @Test
    void pop() {
        Stack stack = new Stack();
        stack.push(1);
        stack.push(2);
        stack.push(3);

        assertEquals(stack.pop(), 3);
        assertEquals(stack.pop(), 2);
        assertEquals(stack.pop(), 1);
    }
}
과제 4 : 앞서 만든 ListNode를 사용해서 Stack을 구현하세요.
-Stack 구현
public class Stack {

    ListNode head = new ListNode();
    int top = -1;

    public Stack() {
    }


    public void push(int data) {
        ListNode p = this.head;
        int cnt = this.top;

        while(cnt-- > -1) {
            p = p.next;
        }

        p.next = new ListNode(data);
        top++;
    }

    public int pop() {
        ListNode p = head;
        int cnt = top;

        while(cnt-- > 0) {
            p = p.next;
        }

        int temp = p.next.data;
        p.next = null;
        top--;

        return temp;
    }


    /**
     * 테스트용 메서드
     */

    public void printAll() {
        ListNode p = head;
        int cnt = top;

        while(cnt-- > -1) {
            p = p.next;
            System.out.print(p.data+" ");
        }
        System.out.println();
    }

    public int size() {
        return top+1;
    }

    public int get(int idx) {
        ListNode p = head;

        while(idx-- > -1) {
            p = p.next;
        }

        return p.data;
    }
}
Test는 위의 Stack과 같습니다.
과제 5 : Queue를 구현하세요.
큐는 스택과 다르게 먼저 들어온 데이터가 먼저 나가는 선입 선출(First In-First Out)의 입출력 형태를 가지는 자료 구조이다. 터널과 같은 모양을 상상하면 될 거 같다.

- 배열을 이용한 Queue
import java.util.NoSuchElementException;

public class ArrayQueue {

    int[] queue = new int[5];
    int top = -1;
    int bottom = 0;

    public ArrayQueue() {
    }


    public void push(int data) {
        queue[++top] = data;
    }

    public int pop() {
        if(top < bottom) {
            throw new NoSuchElementException("queue is empty.");
        }

        return queue[bottom++];
    }


    /**
     * 테스트용 메서드
     */

    public void printAll() {
        for(int i = bottom ; i <= top ; i++) {
            System.out.print(queue[i]+" ");
        }
        System.out.println();
    }

    public int size() {
        return top - bottom + 1;
    }

    public int get(int idx) {
        return queue[idx+bottom];
    }
}
- ListNode를 이용한 Queue
import java.util.NoSuchElementException;

public class ListQueue {

    ListNode head = new ListNode();
    int top = -1;

    public ListQueue() {
    }


    public void push(int data) {
        ListNode p = head;
        int cnt = top;

        while (cnt-- > -1) {
            p = p.next;
        }

        p.next = new ListNode(data);
        top++;
    }

    public int pop() {
        if (top < 0) {
            throw new NoSuchElementException("queue is empty.");
        }

        ListNode p = head;

        int temp = p.next.data;
        p.next = p.next.next;
        top--;

        return temp;
    }


    /**
     * 테스트용 메서드
     */

    public void printAll() {
        ListNode p = head;
        int cnt = top;

        while(cnt-- > 0) {
            p = p.next;

            System.out.print(p.data+" ");
        }
        System.out.println();
    }

    public int size() {
        return top+1;
    }

    public int get(int idx) {
        if(idx > top) {
            throw new IndexOutOfBoundsException("top = "+top);
        }

        ListNode p = head;

        while (idx-- > -1) {
            p = p.next;
        }

        return p.data;
    }
}
- QueueTest
import org.junit.jupiter.api.Test;

import static org.junit.jupiter.api.Assertions.*;

class QueueTest {

    @Test
    void push() {
        Queue queue = new Queue();

        queue.push(1);
        queue.push(2);
        queue.push(3);

        assertEquals(queue.size(), 3);
        assertEquals(queue.get(0), 1);
        assertEquals(queue.get(1), 2);
        assertEquals(queue.get(2), 3);
        queue.printAll();
    }

    @Test
    void pop() {
        Queue queue = new Queue();
        queue.push(1);
        queue.push(2);
        queue.push(3);

        assertEquals(queue.pop(), 1);
        assertEquals(queue.pop(), 2);
        assertEquals(queue.pop(), 3);
        queue.printAll();
    }
}
'Language > 자바 정리 할래' 카테고리의 다른 글
| 6주차 과제: 상속 (0) | 2020.12.21 |
|---|---|
| 5주차 과제: 클래스 (0) | 2020.12.19 |
| 3주차 과제: 연산자 (0) | 2020.11.24 |
| 2주차 과제: 자바 데이터 타입, 변수 그리고 배열 (0) | 2020.11.18 |
| 1주차 과제: JVM은 무엇이며 자바 코드는 어떻게 실행하는 것인가. (0) | 2020.11.10 |


